


description Installation Instructions keyboard_arrow_down
- picture_as_pdfHow-To - Liquid Urethane Motor Mount Replacement Insert Blog
- picture_as_pdf60A MSDS Sheet - Liquid Urethane
- picture_as_pdf60A MSDS Sheet - Activator
- picture_as_pdf80A MSDS Sheet - Liquid Urethane
- picture_as_pdf80A MSDS Sheet - Activator
- picture_as_pdf80A HP MSDS Sheet - Liquid Urethane
- picture_as_pdf80A HP MSDS Sheet - Activator
- picture_as_pdf94A MSDS Sheet - Liquid Urethane
- picture_as_pdf94A MSDS Sheet - Activator
unarchive In The Box of diymmi keyboard_arrow_down
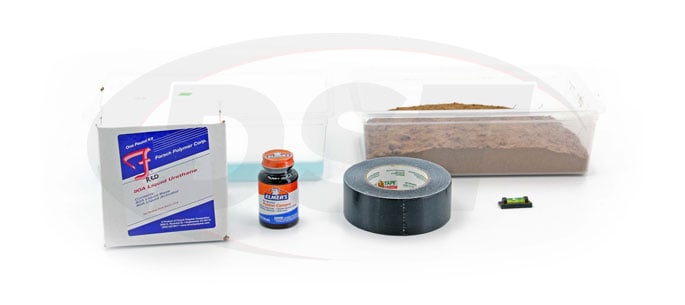
- 1 of Urethane
- 1 of Activator
- 1 of Stirring Stick
- 1 of Installation Instructions
lock Warranty Information keyboard_arrow_down
WARRANTY:
DST carries a 5-Year Warranty.
DST warrants their parts to be free of defects in materials and/or workmanship during this timeframe as measured from the date of purchase.
If a DST part should fail due to materials or manufacturing defects while under warranty, we will provide a replacement of the part upon return of the defective part.
Wearable RUBBER parts are not covered under warranty (Dust boots, bushings, bump stops, etc.)
diymmi | DIY Liquid Urethane Engine and Motor Mount Inserts
"Do It Yourself" Motor Mount Inserts Kit
Why Use Motor Mount Inserts?
- Increase Horsepower to the Ground
- Reduced Wheel Hop
- More Responsive Motor
The first and foremost reason for firming up your motor mounts is to hold the engine more firmly in place. Often the more pliable stock motor mounts will allow the engine to move too much - resulting in wheel hop and a loss of power. The more extreme version of this is when an owner has increase the vehicle's horsepower more than the stock motor mounts were meant to handle. This can cause tearing the stock motor mounts as well as damage to the engine and engine bay should the engine be allowed too much movement.
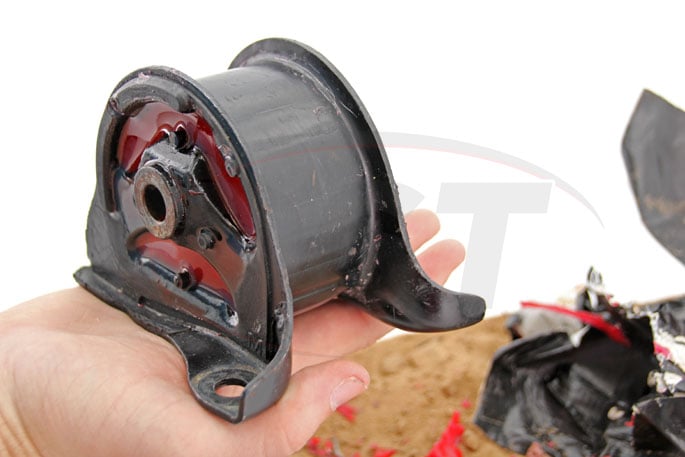
Will This Kit Work on My Motor Mounts?
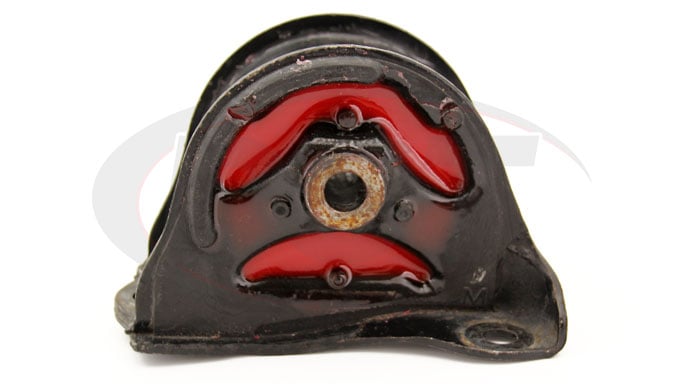
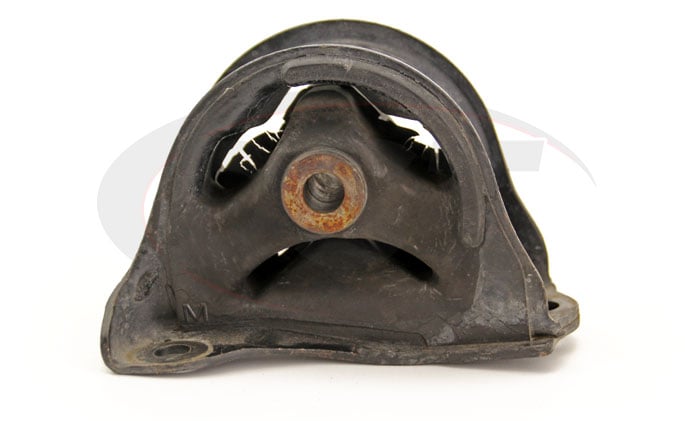
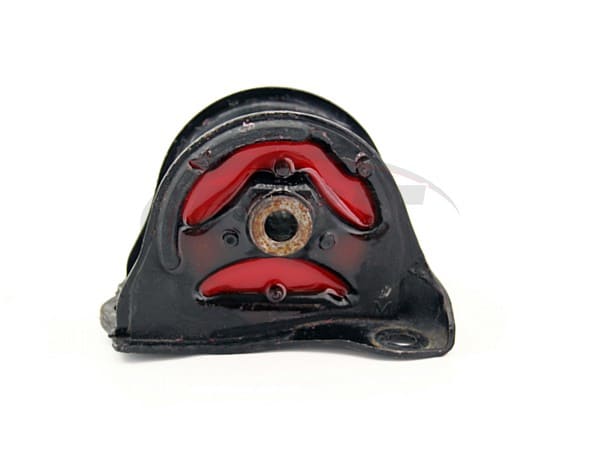
The mounts you're working with MUST have voids in them like the mounts shown here. These voids are what you will be filling with urethane. Without voids - there is nothing to fill! Most FWD vehicles will have several mounts designed like this.
Where's the rest of it?
Much like a new bag of potato chips the liquid urethane can is only about half full. As long as the can is sealed when you receive it you can rest assured that none of the product is missing.
Which Mounts Should I Use?
Most FWD vehicles have several different motor mounts - typically from 4-5 mounts. Some of the motor mounts are designed significantly different from the others. TORQUE mounts are the motor mounts designed to reduce the amount of engine movement when power is applied. Main Mounts are the mounts designed to support and hold the weight of the engine.
TORQUE mounts are the most effective mounts at providing a great rigidity to the engine assembly without transmitting as much natural vibration to the driver. Torque mounts are typically located at the front and or rear of the engine. Main mounts are typically located higher on the engine assembly as the engine weight usually hangs from these.
While it is typically possible to firm up all the mounts on a vehicle - the torque mounts will provide the best trade off of performance and vibration.
What is Required to complete this Project?
Liquid Urethane - available in 60A, 80A or 94A
The following items are not included in this kit and must be purchased at a local hardware store. These can be purchased for approximately $10
- Duct Tape - Seals one side of the mount
- Contact Cement - Helps the duct tape seal against greasy surfaces
- Degreaser - Cleans the mount of grease and oil to ensure an easy project
- Sand - in a box - vital to the project - don't skip this one.
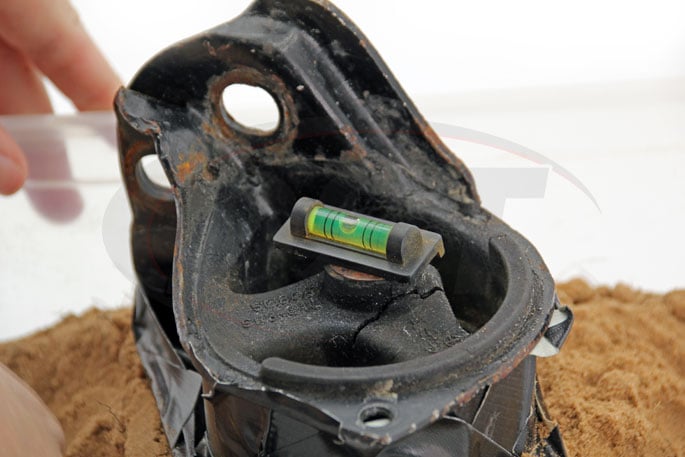
- Level - using a small level will ensure your mount is level in the sand
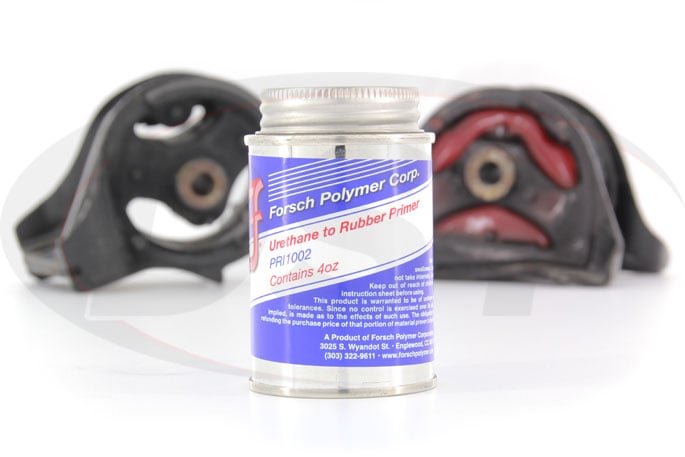
Want the best Urethane bond possible?
After cleaning the rubber you can use a special Urethane-to-Rubber Primer or combine it with an Adhesive to enable the tightest bond possible.
The Primer can be used by itself in this application or combined with the Adhesive depending on how secure you feel the urethane needs to be. The project can be completed without these additions, but they will help the binding process.
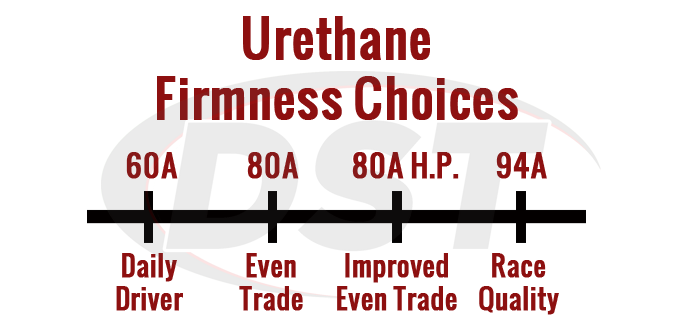
What Level of Hardness should I use?
There are a number of firmness or "durometer" levels offered. The default is 80A as it's the most used and most popular. These are:
- 60A - For the Daily Driver - This is the softest formula offered that will still make a noticeable difference in vehicle performance. This softer formula is best for tuners that still want to increase performance without trading off as much personal comfort.
- 80A - Even trade off between performance and vibration when it comes to motor mount inserts. This formula is the most popular for it's ability to significantly increase vehicle performance while still allowing some small amount of flex in the mounts to keep vibration and noise to reasonable levels
- 80A High Performance - an improvement on the already great 80A offers more heat resitance and a higher tear rate without adding noise and vibration
- 94A - Race Quality - Not for the daily driver. This formula is the hardest of the 3 available. Providing the best reduction in motor movement - this version will also allow a rather significant amount of engine vibration to be transmitted into the vehicle.

How Fast does the Polyurethane Cure?
At room temperature the polyurethane cures in about 7 days. You can accelerate this process by curing your mounts at 150 degrees Fahrenheit. Doing this decreases the cure time to about 18 hours.
Is one kit enough to complete my project?
This kit produces about 13.52 fl oz (400 mL) of Liquid Urethane. On most vehicles this will be enough to complete the project on ALL the mounts. This product has been proven to work well for creating motor mount inserts and lasting for the life of the mount.
Where can I find the installation instructions?
The installation instructions for this product can be found in our How-To - Liquid Urethane Motor Mount Replacement Insert Blog

Product Reviews for diymmi | DIY Liquid Urethane Engine and Motor Mount Inserts
- 5 Star (77)
-
-
- 96%
-
- 4 Star (3)
-
-
- 4%
-
- 3 Star (0)
-
-
- 0%
-
- 2 Star (0)
-
-
- 0%
-
- 1 Star (0)
-
-
- 0%
-
DST diymmi
starstarstarstarstar" PERFECT "
Perfect! Serious site! Shipping and receiving fast in France. THANKS ! quality product\n
verified_user Verified Buyer - CHATEAU - . DST diymmi - 5 out of 5starstarstarstarstar" Review 2 Years Later "
At first, I had doubts cuz the claims are just too hard to believe. But 2 years after installing this on my busted motor mounts and they still look like they could hold up for another 10 years at least. Great product. Worth every penny.
verified_user Verified Buyer - Albert ta - . DST diymmi - 5 out of 5starstarstarstarstar" Review 2 Years Later "
The material holding up great, easy to mix, great working time, once it kicked, the cure was even and heat moderate, no shrinking and trimming just before full cure was easy, end result excellent, recommended for anyone looking for that durometer rating.
verified_user Verified Buyer - Aaron Hollywood pepin - . DST diymmi - 5 out of 5starstarstarstarstar" Review 2 Years Later "
I got the liquid to make my own motor mounts roughly 2 years ago and Ive had no issues for my Acura Integra thats boosted on 12 pounds making a little over 300 horsepower and they hold up amazing I Honestly couldnt ask for a better motor mount.
verified_user Verified Buyer - Nichole Previte - . DST diymmi - 5 out of 5Instructions - DIY Motor Mount Inserts
For a full breakdown and How-To Video visit our How-To - Liquid Urethane Motor Mount Replacement Insert Blog
Prepping The Mounts
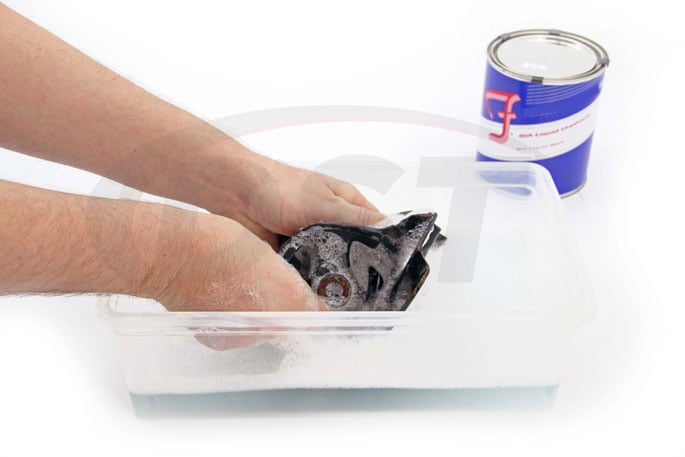
Step One - CLEAN!
For the urethane to bond correctly and to ease the overall process - the mounts must be thoroughly cleaned of grease and dirt. A little cheap degreaser can go a long way over simple soap. Take the time to use real degreaser - it's usually just a spray on - spray off process anyway.
Step Two - Sealing One Side
The motor mount inserts are made by pouring a liquid urethane into the voids of the mounts and allowing it to dry. In order to do this you'll need to completely seal off one side of the mounts. When you first pour the urethane into the mounts it will have a very liquid consistency. Even the smallest hole in your sealing jobs will allow the urethane to seep out.
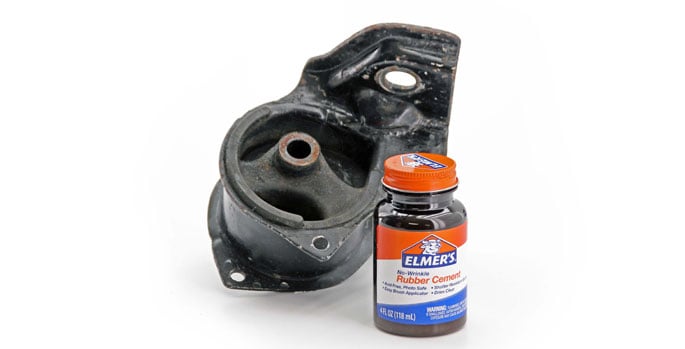
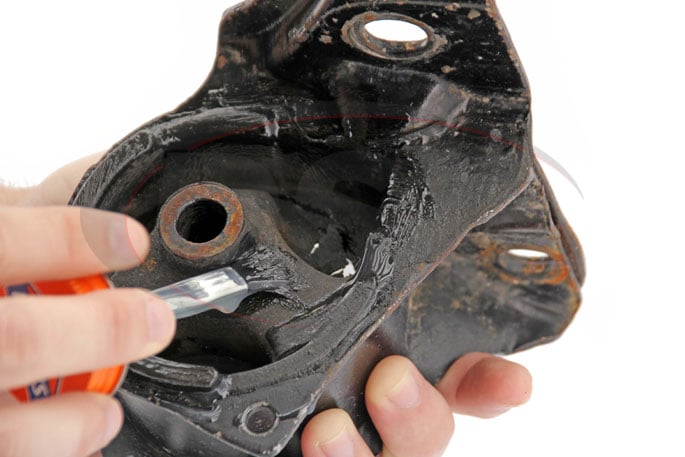
The best way to do this is with some contact cement and duct tape. While duct tape alone will usually work - the contact cement will ensure a good seal - especially if there's any greasy residue on the mounts (the tape will not adhere properly). Start by painting the outside edge and inside circumference of the side of the mount you're going to seal off - with contact cement. Anywhere you need to be sure there's a good seal - use this liberally - you'll be able to pull/scrape it off later.
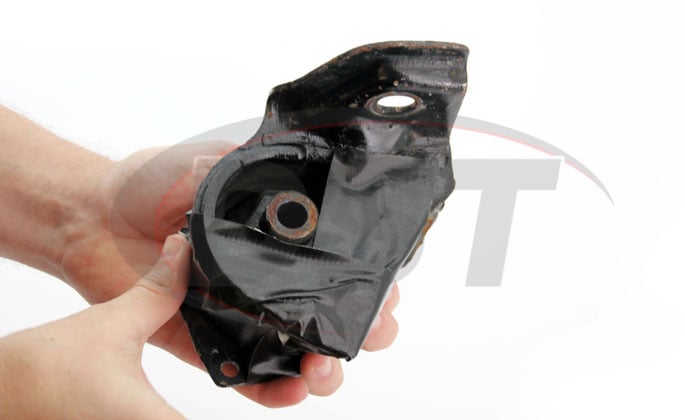
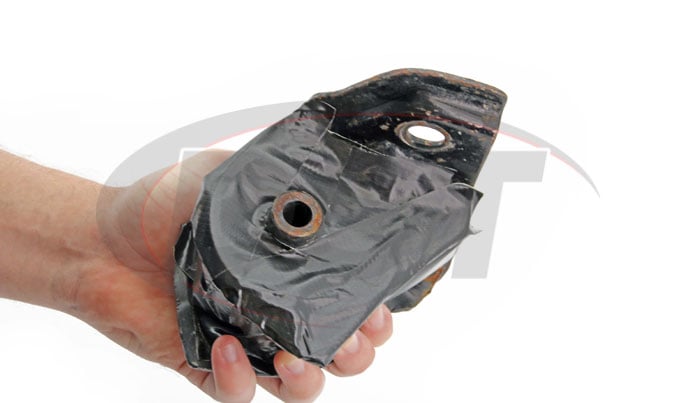
Once you've set a good layer of contact cement, seal off the mount with the duct tape. Use several strips of tape at different angles from the center of the mount. Continue adding tape around the center of the mount until you've sealed it off completely. Some users wont have the center piece sticking out of one side and won't have to work around it - either way just keep adding tape until it's properly sealed off.
Duct tape is cheap - so use as much as necessary before you feel good about the job - then add a little more.
Setting Up the Mounts
It's important that the mounts are completely level before you pour the urethane into them. If they're laying at an angle the mount will not turn out right.
Prepare a small box of sand for the mounts. Setting the mounts into the sand will: 1) Allow a perfectly level placement - even if there are protrusions from the mounts that would otherwise make it sit screwy, and 2) Help seal off any small holes in your sealing job. If the hole is small, a little urethane will leak out into the sand and the sand will help it congeal faster - effectively sealing the hole in the mount.
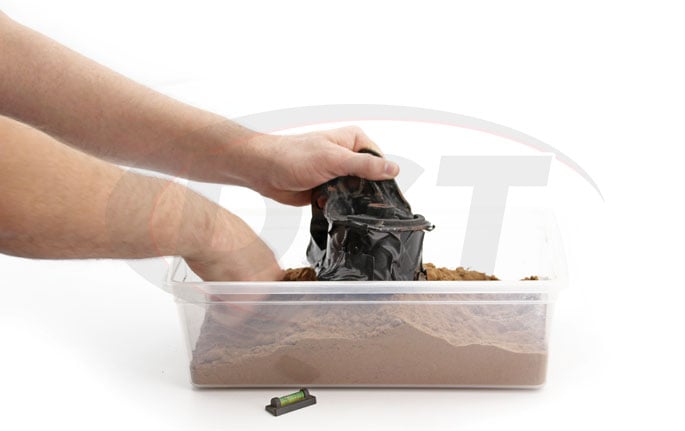
DO NOT attempt to do this without the sand box. While it is possible to do so - using the sand box will help ensure you do the job right the first time. Once you mix the urethane, you'll only have 15-20 minutes of working time before it's too firm to work properly with. You won't have enough time to decide you SHOULD have used the sand box.
Mixing the Urethane
DO NOT DO THIS UNTIL YOU'RE 100% Ready to Pour!
The correct mixing ratio is absolutely VITAL to the urethane setting correctly. That's why each set comes in a pre-measured container. Do not attempt to use only PART of a kit - doing so may cause the urethane to not set correctly
Each kit should include:
- Urethane - in the hardness level you ordered. Comes in small paint can style container
- Activator - a very liquid substance in a small bottle
- Stirring Stick

Before doing ANYTHING with these substances read through all the warnings and adhere to them! Most importantly - mix and use these outside in a well ventilated area.
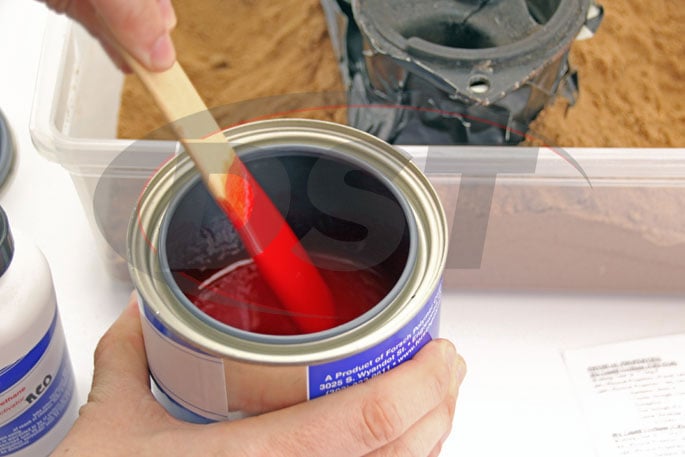
Remove the lid from the larger paint can containing the urethane and set it aside. Take the bottle of activator and shake it well before adding it to the urethane.
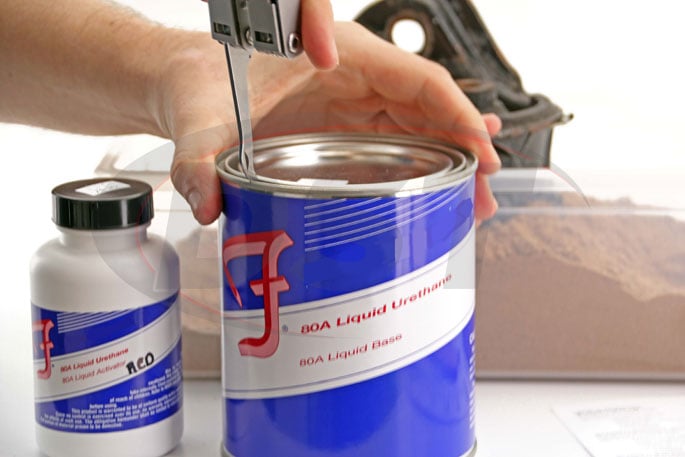

Thoroughly mix the activator and urethane with the provided mixing stick. Be sure to scrape the sides of the can and even scrape off the stirring stick to ensure you've mixed all of the urethane in with the activator.
Once you've mixed the urethane and activator you're ready to pour it into the mount! Once the urethane is mixed you only have about 15-20 minutes where it's pour-able!
Pouring the Urethane
Slowly pour the mixed urethane into the open side of the mounts. Allow for the urethane to fill all the voids in the mount. It may take a minute for it to settle completely flat - so take your time. If it seems to be leaking out a LITTLE - don't panic - the sand will help clot up the hole and slow the leak.
Fill the mounts to the top - it's even OK if some spills over the outside edge.
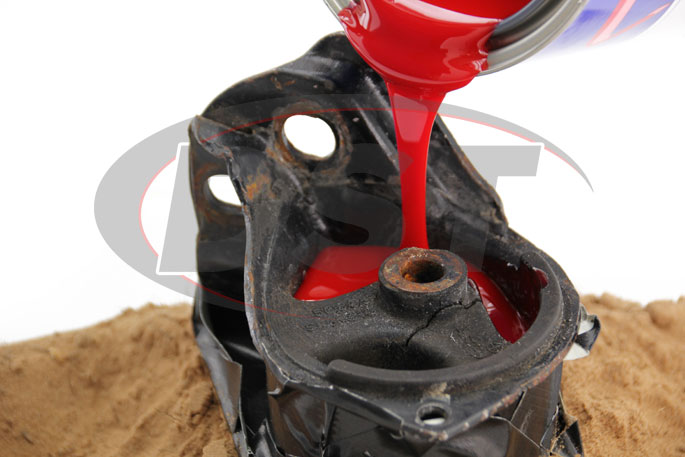
Once the mounts are full wait about 10 minutes. In 10 minutes the urethane should still be very liquid and you can top off the mounts with the remaining urethane in the can. This is particularly important if you have a small leak in the sealed side of the mount. Don't wait longer than 20 minutes to check up on the mounts as by that time the urethane will start to become less workable.
A Job Not So Well Done
It is very important that you use sand. If you do a poor job of setting up the mount in your sand, your results can be disastrous. If there is any type of hole in your seal job, the urethane can seep out. The sand can stop that, so be sure to pack the sand under the mount in order to clog any leak. If not, you get this:
If the urethane seeps out like this, you're final product will be less than desired. Check out the mount we did with a poor sand job:
The Finished Product
By the next day you should be able to take the mounts out of the sand box and remove the tape from the opposite side. Sometimes if you had a small leak you'll find small clumps of sand attached to the other side - these pry/peel off easily and will not affect your new mounts.

The tape should pull off easily and if you want to clean them up further you can scrape off the left over contact cement - however if you really don't care too much you could even leave the tape on - it won't hurt anything.
Finished "Do It Yourself" Motor Mounts
Additional Notes For Users
Some users have asked if this will work for their mounts if the center portion has completely torn away from the rest of the mount. The answer: YES! The only additional consideration is the correct centering/alignment of the mounting point that goes through the mount. While the sandbox will make it significantly easier to do this - special care will be needed to ensure centering and alignment.
Disclaimer
In using these instructions and urethane kits you accept complete responsibility for the outcome of your project. Only you can ensure this is done correctly and we will not be held responsible if your mounts do not turn out like you wanted.
A significant amount of information has been provided here - however some projects may be unique and will need special attention or a different mode of creation. While we're happy to help with any questions - we cannot guarantee the outcome of your particular project.
You may not copy, post or reproduce this "How To" information or pictures without written consent from Diverse Suspension Technologies.
question_answer Customer Questions and Answers
- Question:
- Can you get the diymmi in a durometer of 94?
- Answer:
- Yes, you can select the polyurethane to have a durometer of 94.
- Question:
- How much will this make?
- Answer:
- Part number diymmi will make 400ml.
- Question:
- How many mounts can I do with the diymmi liquid urethane. Can you give me some sort of estimate?
- Answer:
- The diymmi kits on average, make about 4-5 mounts. The kit comes with about 13.52 fl oz (400mL).
- Question:
- How much will kit diymmi make?
- Answer:
- Part Number diymmi will make 400 ml, or 1 2/3 cups of liquid urethane.fo
- Question:
- Do you ship to the Philippines?
- Answer:
- Yes. We ship internationally .
- Question:
- Can I get part number diymmi shipped to Malaysia?
- Answer:
- Yes, we do ship to Malaysia.
- Question:
- How much in volume does the diymmi make?
- Answer:
- This diymmi kit produces about 13.52 fl oz (400 mL) of Liquid Urethane.
- Question:
- Can the part number DIYMMI be used on the 4 new mounts,(Front and Rear, Driver and Passenger Side, Upper and Lower) and is there enough to treat all four mounts?
- Answer:
- This kit produces about 13.52 fl oz (400 ml) of Liquid Urethane. On most vehicles, this will be enough to complete the project on ALL the mounts. This product has been proven to work well for creating motor mount inserts and lasting for the life of t the mount. ...see more
- Question:
- What durometer is recommended to make sway bar bushings?
- Answer:
- The diymmi is for motor mounts so we cannot recommend to use it for sway bar bushings.
- Question:
- Can you get this in different durometer?
- Answer:
- Yes, you can, the drop-down shows up once you select red or black and you can select the durometer from there.
- Question:
- Is there any extra cleaning/degreasing that needs to be done if Im using the diy poly kit on a brand new mount?
- Answer:
- As long as all the surface area is clean you will be good to go.
- Question:
- Once I fill my mounts with the diymmi, how long do I need to wait before installing them?
- Answer:
- At room temperature the polyurethane cures in about 7 days. You can accelerate this process by curing your mounts at 150 degrees Fahrenheit. Doing this decreases the cure time to about 18 hours.
- Question:
- Can the diymmi be used for any type of bushing or the motor mounts only?
- Answer:
- The diymmi kits are specified for the motor mounts, so we cannot recommend these kits for anything else.
- Question:
- What durometer does this come in?
- Answer:
- Part number diymmi comes in 60A, 80A, 80A High-performance and 94A.
- Question:
- Do you need to have an outer shell for the diymmi to work?
- Answer:
- You will need to have some type of mold for the liquid to harden to and take shape of for the diymmi kit.
